Understanding XCUITest screenshots and how to access them
Getting the screenshots of your app doesn’t need to be complicated, and it shouldn’t require you to install additional applications to do it. Sure you can use any other third-party library, but sometimes simple is better. Also, it is always fun to explore and understand more of the process so you can be the judge on what works best for your case. In this post, I’ll show you how to work with XCUIScreenshot so you can have easier access to your screenshots and later you can build any scripts to process the screenshots.
First, let’s have a look at some cases where you would want to get screenshots of your app.
Why collect screenshots?
There are some cases where you would want to collect screenshots of your app:
When you are running a UITest, and something goes wrong, you might want to capture the current screen so you can use that screenshot to debug the error.
If you want to upload your app to App Store Connect, you’ll be required to upload screenshots of your app, so you might want to automate the screenshot taking.
You want it for internal use, maybe you want to capture how your app looks in different simulators to show them to a designer for improvements.
Whatever the case might be, it is useful to know how to take the screenshots and more importantly, how to access them.
I’ll assume you have familiarity with XCUITest. But in case you are not so confident I’ll do a quick review of UI Testing on Xcode, so we have a base to start from. If you would like more resources on UI Testing, check the “Related Topics” sections for more links on the topic.
Using XCUITest to navigate your app
If we want to build tests for our User Interface, we can make use of Apple’s XCUITest framework. The framework provides utilities to launch the application on a simulator, and also emulate the user navigation and gestures (taps, swipes, pinch, etcetera). During the simulated user navigation, we can run assertions on what is being displayed on the screen (i.e. verifying the existence of UI elements).
Let’s see some examples. First, validate that the first screen the user sees when our application launches contain a button with the label “Login”.
| |
If that assertion is true, the test will pass, if it’s false, it’ll fail. As I mentioned before we can simulate user interactions. Let’s imagine we are going to let the user login as a guest by tapping a button with the label “Login as a guest”. Also, to verify that the user reached the second screen, we are going to confirm that the app displays some static texts that say: “Welcome anonymous”.
| |
I think you get the idea. I encourage you to take more time to learn UI Testing, it is useful.
Testing allows you to catch bugs before delivering your app to your users. Also, it helps us avoid regressions errors. For example, when some new change in your code generates a bug on a previous workflow that you already have tests for. If you have good tests, refactoring code becomes a much easier and stress-free process because you can always count on your tests, making sure that everything keeps working as you expect.
In simple terms, tests are important. Now, Back to the topic of this post, screenshots.
At any moment during the simulation, you can take screenshots. The screenshots can be of any element that conforms with the XCUIScreenshotProviding protocol, like XCUIScreen and XCUIElement. Let’s have a look.
Taking screenshots
If we want to take a screenshot of our initial screen, we can do the following:
| |
With the above code, we took a screenshot, but we didn’t do anything with it so we can’t access it. To save it to the current test, we need to add it as an attachment.
Let’s do that:
| |
Perfect! Now we have attached it to the test, but how do we view it?
To view them you can check the “Test Report” interface. You’ll see the test report interface right after you run your tests, or by checking the test report in the Navigator (by pressing Command+9).
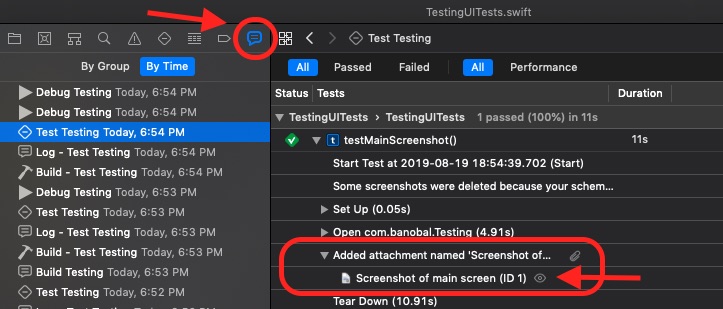
As you can see in the test report interface, there is a small eye icon next to the attached file. If you click that icon, you’ll see a preview of the screenshot.
You can take as many screenshots as you want at any point in the user navigation and attach them to the test. But you might want to access the file directly not through Xcode, how can we do that?
Where are test logs stored?
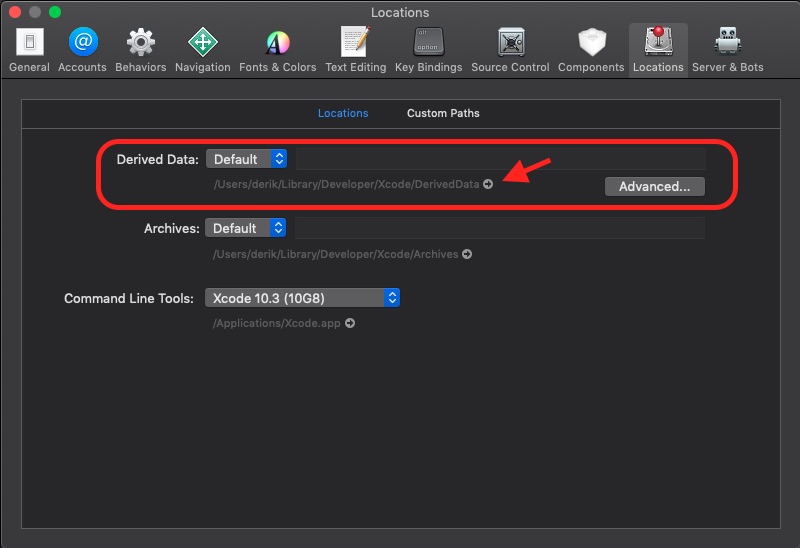
When you run a test in Xcode, all the logs and attachments are stored in the DerivedData directory. To see the location and to access the test logs in Xcode, you can navigate to Xcode’s Preferences and click the Locations item. In there you’ll see the “Derived Data” location. You could also click the arrow next to the path to open it using Finder.
You can navigate to the DerivedData directory, and you’ll see all your projects. Inside the project you ran the tests, go to Logs > Test you’ll find all the tests results. The results are in an xcresults package. If you are using Finder, you can right-click and Show Package Contents to view the content. If you are using the terminal, you can just cd into it. Inside the xcresult package, you’ll find an Attachment directory with all your screenshots.
We have located the screenshots. But we want a more straightforward way to access them if we’re going to have a predictable path that we could use on our scripts.
Define a specific path to store the Test logs so we can access them easily
By default Xcode stores Derived Data in the following path:
| |
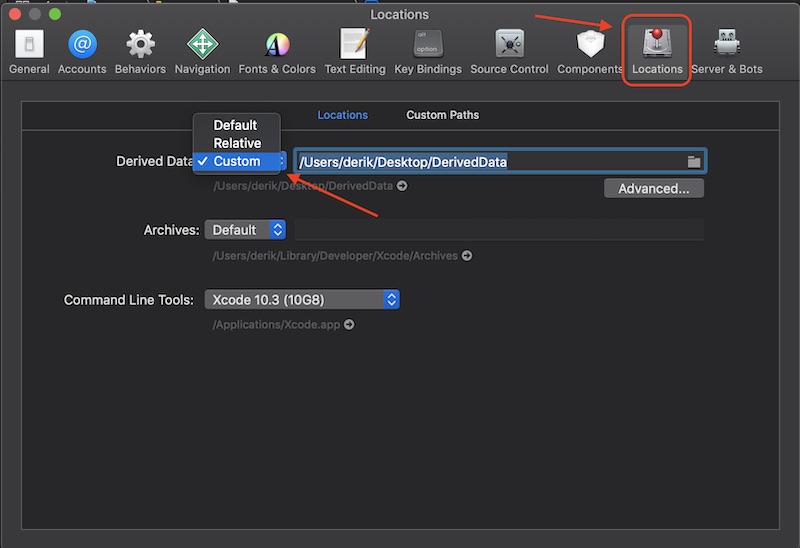
If we are using Xcode, we can change that path in Settings then click Locations and in the dropdown select Custom for Derived Data.
If you are using the terminal to run your tests, you can use the --derivedata-path argument to set the path.
| |
Inside you’ll find Logs/Tests with the following hierarchi:
| |
We can obtain the latest xcresults by sorting the list of files by date:
| |
or you can get the latest on the LogStoreManifest.plist parsing the file:
| |
Once inside the xcresults, we will see a file structure similar to the following:
| |
We are only interested in the Attachments directory, where our screenshots are located.
Now that we know where to find them, you can extract them in any way you find more intuitive. You can just open the containing folder using Finder, with a script like the following or any other way you find more comfortable.
| |
With that, you will be able to script any other workflow for your screenshots. But before we are done, let’s improve how we take screenshots and maybe add more information to our screenshot’s.
Improving the code for taking screenshots
First, let’s reduce code repetition and create a function we can call to take screenshots at any point in the simulation. Lets add the takeScreenshot function.
| |
Now we can call takeScreenshot() at any point, and we’ll have the screenshot attached to our test. That removes code duplication every time we want to take a screenshot, but as you have seen the names of the screenshots are not that helpful.
Providing more information on our screenshots
Imagine getting a list of images with the following names:
| |
It’ll be hard to know what each screenshot represents. Let’s improve that by adding a string to identify our screenshots.
| |
Now when we call takeScreenshot, we provide the string, and the screenshots will have more descriptive names. I also included UIDevice.current.name so we know which simulator we used.
Let’s see an example of how our tests could look:
| |
That will give us a better name for our screenshots.
Final Thoughts
Screenshots can be a valuable source of information, with what we learned you have a good base to start using them in your projects.
There are other third-party tools to automate screenshot taking on your app. But maybe to begin with you can use the scripts we created here and when you outgrow them you can install additional libraries, but with the confidence that you know what is going on behind the scenes.
I hope you find the information here useful, let me know what you think and if you have any questions, let me know, and I’ll be glad to help.
#Related topics/notes of interest:
An article with some good tips and tricks on Xcode UI testing
Apple’s article on adding attachments to test and activities
Michele Titolo informative article on Test logs in Xcode to understand where the logs are stored.
Apple’s documentation on UIDevice if you want to obtain information of the current simulator to add to your screenshot names.